
搜索到
387
篇与
的结果
-
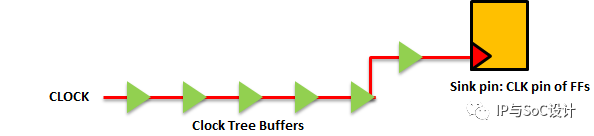
 博文速递:Clock Gating VLSI SoC Design IP与SoC设计 2022年05月09日 12:10 江苏Clock GatingClock signal is the highest frequency toggling signal in any SoC. As we discussed in the post: Need for Low-Power Design Methodology, the capacitive load power component of the dynamic power is directly proportional to the switching frequency of the devices. This implies that clock path cells would contribute maximum to the dynamic power consumption in the SoC. Power consumption in the clock paths alone contribute to more than 50% of the total dynamic power consumed within modern SoCs. Power being a very critical aspect of the design, one needs to make prudent efforts to reduce this. Clock Gating is one such method. Let's try and build further on this perspective.Clock feeds the CLOCK pins all the Flip-Flops in the design. Clock Tree itself comprises of clock tree buffers which are needed to maintain a sharp slew (numerically small) in the clock path. Refer to the post Clock Transition for details. Consider the above figure. It is not necessary that the output of the flip-flop would be switching at all times. Modern devices support various low-power modes in which only a certain part of your SoC is working. This may include some key features pertaining to security or some critical functional aspects of your device. Apart from this, there are some configuration registers in your device which need to be programmed either once or very seldom. So, let's say, the above FF will not be switching states for a considerable period of time. If it is used the way it is, what's the problem? Power! Clock is switching incessantly. Clock Tree buffers are switching states and hence consuming power. So are the FFs. Remember that FF itself is made up of latches. So, despite the fact that input and output of the FF is not switching, some part of the latch is switching and consuming power.What could be done to alleviate the above problem? Clock Gating is one such solution. Here's how it'll help.If you place an AND gate at the clock path and knowing that you don't need a certain part of your device to receive clock, drive a logic '0' on the ENABLE pin. This would ensure that all the Clock Tree buffers and the sink pin of the FF are held at a constant value (0 in this case). Hence these cells would not contribute to dynamic power dissipation. However, they would still consume leakage power.Similarly, you can place an OR gate and drive it's one input to logic 1. Again, you would save on the dynamic power.However, a word of caution. The output of the AND gate feeding the entire clock path might be glitchy. See the following figure:Solution: The output won't be glitchy if the enable signal changes only when the CLOCK signal is low. So, all you gotta make sure is that ENABLE is generated by a negative-edge triggered FF. This would ensure that the signal is changing after the fall edge of the CLOCK signal.Similarly, while using an OR-gate, clock pulse would be propagated if the ENABLE signal changes when the CLOCK is high. Make sure that it is generated by a positive-edge triggered FF in order to avoid any glitch being passed onto the FFs. Why would a glitch be detrimental anyway? The answer is:Glitches constitute an edge! FF might sample the value because they are edge-triggered. But, problem is that all FFs have a certain duty cycle requirement (Also called Pulse-width check), which needs to be fulfilled in order to ensure that they don't go into METASTABILITY. And if an unknown state : X is propagated in a design, the entire functionality of the chip can go haywire!Some terminologies: •AND/NAND gate based clock gating is referred to as Active-High Clock Gating. •OR/NOR gate based clock gating is referred to as Active-Low Clock Gating.NAND and NOR clock gates work similar to AND and OR respectively.So, Clock Gating is an efficient solution to save dynamic power consumption in the design. Modern SoCs have many IPs integrated together. Placing a clock gate and enabling them in various possible combinations is what gives rise to different low-power modes in the device.If any content of this article infringes, please contact us to remove this article.来自微信
 -
5 分钟,教你从零快速编写一个油猴脚本! 1T服务圈儿2022年05月07日17:30江苏来源:经授权转自 AirPython(ID:AirPython)作者:星安果Tampermonkey,又称 Greasemonkey 油猴脚本,是一款免费的浏览器扩展,可用于管理用户脚本,它本质上是对浏览器接口的二次封装油猴脚本可用于更改页面布局样式、完成页面自动化、去广告、下载影视等功能,适用于主流的浏览器官网:https://www.tampermonkey.net/index.php介绍Tampermonkey 特点包含:内置的编辑器,可以非常方便地管理、编辑用户脚本支持自动更新检查功能标签中脚本运行状态速览可以通过压缩文件、云存储进行脚本备份及还原通过面板新建一个用户脚本,默认会生成一个模板,模板内容如下:模板中会预设部分元数据,用于定义脚本的名称、版本号、更新方式、运行页面、权限等功能常见的元数据包含:@name - 油猴脚本的名称 @namespace 脚本的命名空间,用于确定脚本的唯一性 @version 脚本的版本号,用于脚本的更新 @description 脚本的描述信息 @author 作者 @require 定义脚本运行之前需要引入的外部 JS,比如:jQuery @match 使用通配符执行需要匹配运行的网站地址 @exclude 排除匹配到的网站 @grant 指定脚本运行所属的权限 @connect 用于跨域访问时指定的目标网站域名 @run-at 指定脚本的运行时机 @icon 用于指定脚本的图标,可以设置为图片 URL 地址或 base64 的字符串常见 API油猴提供了很多强大的 API,用于操作缓存及窗口等,如果不需要使用这些 API,可以声明权限为 none,即:@grant none2-1 打印日志用于在控制台中打印日志,便于调试// 授权 @grant GM_log // 在控制台打印日志 GM_log("Hello World");2-2 缓存管理包含对缓存的新增、获取、删除,在使用之前我们都需要使用关键字 @grant 进行授权//授权 // @grant GM_setValue // @grant GM_getValue // @grant GM_deleteValue //设置缓存 GM_setValue("hello", true); //获取缓存,默认值为true GM_getValue("hello", true); //删除缓存 GM_deleteValue("hello")2-3 缓存监听有时候,我们需要对缓存中的某个键的值进行监听,当发生变化时,调用一个方法事件比如,这里新增了一个监听器,对键名为 hello 的值进行监听// 授权 // @grant GM_addValueChangeListener // @grant GM_removeValueChangeListener // 添加一个监听器 const listener_id = GM_addValueChangeListener('hello', function(name, old_value, new_value, remote){ if(hello == false){ //具体的调用方法 //.... } }) //监听监听器 GM_removeValueChangeListener(listener_id);2-4 打开一个标签格式:GM_openInTab(url, options)该 API 可用于打开一个新的标签页面其中,第一个参数用于指定新标签页面的 URL 地址,第二个参数用于指定页面展示方式及焦点停留页面// 授权 // @grant GM_openInTab // 打开新页面 var onpenNewTap = function (){ //打开百度页面 //active:true,新标签页获取页面焦点 //setParent :true:新标签页面关闭后,焦点重新回到源页面 newTap = GM_openInTab("https://www.baidu.com",{ active: true, setParent :true}); ...2-5 跨域请求在授予 GM_xmlhttpRequest 权限之后,就可以跨域发送请求了PS:第一次跨域请求时,会弹出请求对话框,需要选中允许,才能正常进行跨域请求// 授权 // @grant GM_xmlhttpRequest ... GM_xmlhttpRequest({ url:"http://www.httpbin.org/post", method:'POST', headers: { "content-type": "application/json" }, data:"", onerror:function(res){ console.log(res); }, onload:function(res){ console.log(res); } }); ...实战一下以某一新闻网站的自动加载下一页为例进行说明目标网站:IGh0dHBzOi8vd3d3LnBpbmd3ZXN0LmNvbS8=首先,我们使用关键字 @match 指定匹配的网站 URL,使用 @grant 设置权限 GM_log,使用关键字@run-at 指定执行时机为页面加载完成,即:document-end// ==UserScript== // @name 新闻查看更多 // @namespace com.xag.more // @version 0.1 // @license GNU General Public License v3.0 // @description 自动查看下一页 // @author xingag // @match 目标网站 // @icon 图标icon地址 // @grant GM_log // @run-at document-end // ==/UserScript== ...接着,添加一个定时任务,获取每一页底部的加载更多按钮最后,判断元素存在时,执行点击操作即可... (function() { 'use strict'; console.log("location.hostname:",location.hostname) if(location.hostname == "www.pingwest.com"){ setInterval(() => { const more_element = document.querySelector(".load-more-box").querySelector("a") if(more_element){ GM_log("元素存在,点击加载更多。。。") more_element.click(); } }, 2000); } })() ...总结本篇文章以一个简单的实例讲解了编写一个油猴脚本的完整流程为了提升开发效率,实际编写脚本可以使用 VS Code 编译器,安装插件 Tampermonkey Snippets 后再进行用户脚本开发当然,应对一些复杂的场景,可以借助一些优秀的脚手架框架https://github.com/kinyaying/wokoohttps://www.npmjs.com/package/create-tampermonkeyhttps://github.com/qianjiachun/vue3-tampermonkey来自微信
-
通过公网IP 云服务器做开源免费内网穿透推荐 本文以渗透的视角,总结几种个人常用的内网穿透,内网代理工具,介绍其简单原理和使用方法。nps1.1 简介nps是一款轻量级、高性能、功能强大的内网穿透代理服务器。目前支持tcp、udp流量转发,可支持任何tcp、udp上层协议(访问内网网站、本地支付接口调试、ssh访问、远程桌面,内网dns解析等等……),此外还支持内网http代理、内网socks5代理、p2p等,并带有功能强大的web管理端。一台有公网IP的服务器(VPS)运行服务端(NPS)一个或多个运行在内网的服务器或者PC运行客户端(NPC)1.2 特点Go语言编写支持跨平台支持多种协议的代理web管理端1.3 使用方法https://github.com/ehang-io/nps/releasesNPS安装配置找到自己服务器相应版本的server: cd ~ wget https://github.com/cnlh/nps/releases/download/v0.23.2/linux_amd64_server.tar.gz tar xzvf linux_amd64_server.tar.gz cd ~/nps在nps目录下面会有一个nps可执行文件、conf配置目录和web网页目录,我们只需要修改conf/nps.conf即可:vim conf/nps.conf需要改一下#web下面的几个参数,web_host= 服务器IP或者域名 web_username= admin(登录用户名) web_password= 你的密码 web_port=8080(web管理端口)修改#bridge 可以更改 NPC的连接端口。比如我们拿到一台权限受限的服务器,有防火墙,可能只有部分端口(80,443)可以出网,就需要修改成出网端口。##bridge bridge_type=tcp bridge_port=443 # 修改连接端口 bridge_ip=0.0.0.0启动#Mac/Linux ./nps test|start|stop|restart|status 测试配置文件|启动|停止|重启|状态 #Windows nps.exe test|start|stop|restart|status 测试配置文件|启动|停止|重启|状态NPC./npc -server=你的IP:8024 -vkey=唯一验证密码 -type=tcp新建好客户端后,也可以在+中看到,详细的客户端连接命令:web管理端在客户端界面可以通过新增的方式添加客户端连接,每一个连接的vkey都是唯一区分的。每一个客户端,在建立连接后,都可以建立多个不同协议的隧道,这一个个隧道就是不同的代理了。通过不同的协议和端口就可以连接代理的内网机器。frp2.1 简介frp 是一个专注于内网穿透的高性能的反向代理应用,支持 TCP、UDP、HTTP、HTTPS 等多种协议。可以将内网服务以安全、便捷的方式通过具有公网 IP 节点的中转暴露到公网。2.2 特点客户端服务端通信支持 TCP、KCP 以及 Websocket 等多种协议。端口复用,多个服务通过同一个服务端端口暴露。跨平台,但是支持的比nps少一点多种插件,提供很多功能2.3 使用方法下载:https://github.com/fatedier/frp/releases以下内容摘自:https://segmentfault.com/a/11900000218768361. 通过 rdp 访问家里的机器1.修改 frps.ini 文件,为了安全起见,这里最好配置一下身份验证,服务端和客户端的 common 配置中的 token 参数一致则身份验证通过:# frps.ini [common] bind_port = 7000 # 用于身份验证,请自行修改,要保证服务端与客户端一致 token = abcdefgh启动 frps:./frps -c ./frps.ini修改 frpc.ini 文件,假设 frps 所在服务器的公网 IP 为 x.x.x.x:# frpc.ini [common] server_addr = x.x.x.x server_port = 7000 # 用于身份验证,请自行修改,要保证服务端与客户端一致 token = abcdefgh [rdp] type = tcp local_ip = 127.0.0.1 local_port = 3389 remote_port = 6000启动 frpc:./frpc -c ./frpc.ini5.通过 rdp 访问远程的机器,地址为:x.x.x.x:6000开机自启针对 Windows 系统,为了便于使用,可以配置一下开机的时候静默启动。1.在 frpc.exe 的同级目录创建一个 start_frpc.vbs:'start_frpc.vbs '请根据实际情况修改路径 CreateObject("WScript.Shell").Run """D:\Program Files\frp_windows_amd64\frpc.exe""" & "-c" & """D:\Program Files\frp_windows_amd64\frpc.ini""",02.复制 start_frpc.vbs 文件,打开以下目录,注意将<USER_NAME>改为你的用户名:C:\Users\<USER_NAME>\AppData\Roaming\Microsoft\Windows\Start Menu\Programs\Startup3.鼠标右击,粘贴为快捷方式即可。通过 SSH 访问公司内网机器frps 的部署步骤同上。5.启动 frpc,配置如下: # frpc.ini [common] server_addr = x.x.x.x server_port = 7000 # 用于身份验证,请自行修改,要保证服务端与客户端一致 token = abcdefgh [ssh] type = tcp local_ip = 127.0.0.1 local_port = 22 remote_port = 6000 6.通过 SSH 访问内网机器,假设用户名为 test:ssh -oPort=6000 test@x.x.x.x通过自定义域名访问部署于内网的 Web 服务有时想要让其他人通过域名访问或者测试我们在本地搭建的 Web 服务,但是由于本地机器没有公网 IP,无法将域名解析到本地的机器,通过 frp 就可以实现这一功能,以下示例为 http 服务,https 服务配置方法相同, vhost_http_port 替换为 vhost_https_port, type 设置为 https 即可。8.修改 frps.ini 文件,设置 http 访问端口为 8080:# frps.ini [common] bind_port = 7000 vhost_http_port = 8080 # 用于身份验证,请自行修改,要保证服务端与客户端一致 token = abcdefgh9.启动 frps:./frps -c ./frps.ini10.修改 frpc.ini 文件,假设 frps 所在的服务器的 IP 为 x.x.x.x,local_port 为本地机器上 Web 服务对应的端口, 绑定自定义域名 www.yourdomain.com:# frpc.ini [common] server_addr = x.x.x.x server_port = 7000 # 用于身份验证,请自行修改,要保证服务端与客户端一致 token = abcdefgh [web] type = http local_port = 80 custom_domains = www.yourdomain.com11.启动 frpc:./frpc -c ./frpc.ini12.将 www.yourdomain.com 的域名 A 记录解析到 IP x.x.x.x,如果服务器已经有对应的域名,也可以将 CNAME 记录解析到服务器原先的域名。13.通过浏览器访问 http://www.yourdomain.com:8080 即可访问到处于内网机器上的 Web 服务。 对外提供简单的文件访问服务通过 static_file 插件可以对外提供一个简单的基于 HTTP 的文件访问服务。frps 的部署步骤同上。rps 的部署步骤同上。1.启动 frpc,启用 static_file 插件,配置如下:# frpc.ini [common] server_addr = x.x.x.x server_port = 7000 # 用于身份验证,请自行修改,要保证服务端与客户端一致 token = abcdefgh [test_static_file] type = tcp remote_port = 6000 plugin = static_file # 要对外暴露的文件目录 plugin_local_path = /tmp/file # 访问 url 中会被去除的前缀,保留的内容即为要访问的文件路径 plugin_strip_prefix = static plugin_http_user = abc plugin_http_passwd = abc2.通过浏览器访问 http://x.x.x.x:6000/static/ 来查看位于 /tmp/file 目录下的文件,会要求输入已设置好的用户名和密码。常用功能统计面板(Dashboard)通过浏览器查看 frp 的状态以及代理统计信息展示。注:Dashboard 尚未针对大量的 proxy 数据展示做优化,如果出现 Dashboard 访问较慢的情况,请不要启用此功能。需要在 frps.ini 中指定 dashboard 服务使用的端口,即可开启此功能:[common] dashboard_port = 7500 # dashboard 用户名密码,默认都为 admin dashboard_user = admin dashboard_pwd = admin打开浏览器通过 http://[server_addr]:7500 访问 dashboard 界面,用户名密码默认为 admin。加密与压缩这两个功能默认是不开启的,需要在 frpc.ini 中通过配置来为指定的代理启用加密与压缩的功能,压缩算法使用 snappy:# frpc.ini [ssh] type = tcp local_port = 22 remote_port = 6000 use_encryption = true use_compression = true如果公司内网防火墙对外网访问进行了流量识别与屏蔽,例如禁止了 SSH 协议等,通过设置 use_encryption = true,将 frpc 与 frps 之间的通信内容加密传输,将会有效防止流量被拦截。如果传输的报文长度较长,通过设置 use_compression = true 对传输内容进行压缩,可以有效减小 frpc 与 frps 之间的网络流量,加快流量转发速度,但是会额外消耗一些 CPU 资源。[TLS从 v0.25.0 版本开始 frpc 和 frps 之间支持通过 TLS 协议加密传输。通过在 frpc.ini 的 common 中配置 tls_enable = true 来启用此功能,安全性更高。为了端口复用,frp 建立 TLS 连接的第一个字节为 0x17。注意:启用此功能后除 xtcp 外,不需要再设置 use_encryption。代理限速目前支持在客户端的代理配置中设置代理级别的限速,限制单个 proxy 可以占用的带宽。# frpc.ini [ssh] type = tcp local_port = 22 remote_port = 6000 bandwidth_limit = 1MB在代理配置中增加 bandwidth_limit 字段启用此功能,目前仅支持 MB 和 KB 单位。范围端口映射在 frpc 的配置文件中可以指定映射多个端口,目前只支持 tcp 和 udp 的类型。这一功能通过 range: 段落标记来实现,客户端会解析这个标记中的配置,将其拆分成多个 proxy,每一个 proxy 以数字为后缀命名。例如要映射本地 6000-6005, 6007 这 6 个端口,主要配置如下:# frpc.ini [range:test_tcp] type = tcp local_ip = 127.0.0.1 local_port = 6000-6006,6007 remote_port = 6000-6006,6007实际连接成功后会创建 8 个 proxy,命名为 test_tcp_0, test_tcp_1 ... test_tcp_7。ew3.1 简介EW 是一套便携式的网络穿透工具,具有 SOCKS v5服务架设和端口转发两大核心功能,可在复杂网络环境下完成网络穿透。但是,现在工具已经不更新了。。。3.2 特点轻量级,C语言编写可以设置多级代理跨平台但是只支持Socks代理3.3 使用方法以下使用方法均摘自:http://rootkiter.com/EarthWorm/以下所有样例,如无特殊说明代理端口均为1080,服务均为SOCKSv5代理服务.该工具共有 6 种命令格式(ssocksd、rcsocks、rssocks、lcx_slave、lcx_listen、lcx_tran)。正向 SOCKS v5 服务器$ ./ew -s ssocksd -l 1080反弹 SOCKS v5 服务器这个操作具体分两步:a) 先在一台具有公网 ip 的主机A上运行以下命令:$ ./ew -s rcsocks -l 1080 -e 8888b) 在目标主机B上启动 SOCKS v5 服务 并反弹到公网主机的 8888端口$ ./ew -s rssocks -d 1.1.1.1 -e 8888成功。多级级联工具中自带的三条端口转发指令, 它们的参数格式分别为:$ ./ew -s lcx_listen -l 1080 -e 8888 $ ./ew -s lcx_tran -l 1080 -f 2.2.2.3 -g 9999 $ ./ew -s lcx_slave -d 1.1.1.1 -e 8888 -f 2.2.2.3 -g 9999通过这些端口转发指令可以将处于网络深层的基于TCP的服务转发至根前,比如 SOCKS v5。首先提供两个“二级级联”本地SOCKS测试样例:a) lcx_tran 的用法$ ./ew -s ssocksd -l 9999$ ./ew -s lcx_tran -l 1080 -f 127.0.0.1 -g 9999b) lcx_listen、lcx_slave 的用法$ ./ew -s lcx_listen -l 1080 -e 8888$ ./ew -s ssocksd -l 9999$ ./ew -s lcx_slave -d 127.0.0.1 -e 8888 -f 127.0.0.1 -g 9999再提供一个“三级级联”的本地SOCKS测试用例以供参考$ ./ew -s rcsocks -l 1080 -e 8888$ ./ew -s lcx_slave -d 127.0.0.1 -e 8888 -f 127.0.0.1 -g 9999$ ./ew -s lcx_listen -l 9999 -e 7777$ ./ew -s rssocks -d 127.0.0.1 -e 7777数据流向: SOCKS v5 -> 1080 -> 8888 -> 9999 -> 7777 -> rssocksngrok4.1 简介ngrok 是一个反向代理,通过在公共端点和本地运行的 Web 服务器之间建立一个安全的通道,实现内网主机的服务可以暴露给外网。ngrok 可捕获和分析所有通道上的流量,便于后期分析和重放,所以ngrok可以很方便地协助服务端程序测试。4.2 特点官方维护,一般较为稳定跨平台,闭源有流量记录和重发功能4.3 使用方法进入ngrok官网(https://ngrok.com/),注册ngrok账号并下载ngrok;根据官网给定的授权码,运行如下授权命令;./ngrok authtoken 1hAotxhmORtzCYvUc3BsxDBPh1H_**./ngrok http 80即可将机器的80端口http服务暴露到公网,并且会提供一个公网域名。可以通过官网的UI界面查看数据包和流量等等(但是要付费==、)还可以通过一些命令将内网的文件和其他TCP服务 暴露到公网中。有授权的设置文件共享ngrok http -auth="user:password" file:///Users/alan/share无授权的设置文件共享ngrok http "file:///C:\Users\alan\Public Folder"将主机的3389的TCP端口暴露到公网ngrok tcp 3389更多使用方法参考:https://ngrok.com/docs来自微信
-
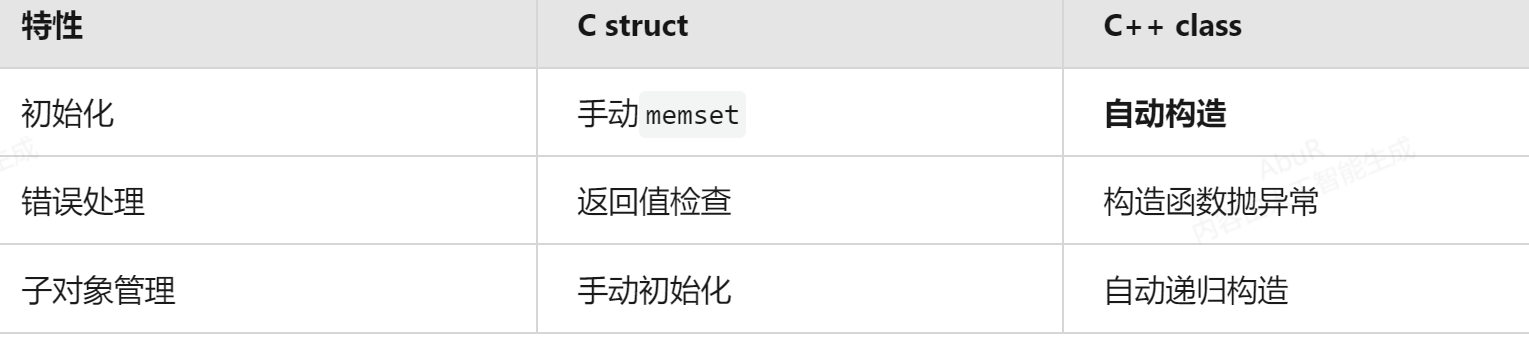
C++ 类的构造函数和析构函数 类的构造函数类的构造函数是类的一种特殊的成员函数,它会在每次创建类的新对象时执行。构造函数的名称与类的名称是完全相同的,并且不会返回任何类型,也不会返回 void。构造函数可用于为某些成员变量设置初始值。下面的实例有助于更好地理解构造函数的概念:实例 #include <iostream> using namespace std; class Line { public: void setLength( double len ); double getLength( void ); Line(); // 这是构造函数 private: double length; }; // 成员函数定义,包括构造函数 Line::Line(void) { cout << "Object is being created" << endl; } void Line::setLength( double len ) { length = len; } double Line::getLength( void ) { return length; } // 程序的主函数 int main( ) { Line line; // 设置长度 line.setLength(6.0); cout << "Length of line : " << line.getLength() <<endl; return 0; } 当上面的代码被编译和执行时,它会产生下列结果:Object is being createdLength of line : 6带参数的构造函数默认的构造函数没有任何参数,但如果需要,构造函数也可以带有参数。这样在创建对象时就会给对象赋初始值,如下面的例子所示:实例 #include <iostream> using namespace std; class Line { public: void setLength( double len ); double getLength( void ); Line(double len); // 这是构造函数 private: double length; }; // 成员函数定义,包括构造函数 Line::Line( double len) { cout << "Object is being created, length = " << len << endl; length = len; } void Line::setLength( double len ) { length = len; } double Line::getLength( void ) { return length; } // 程序的主函数 int main( ) { Line line(10.0); // 获取默认设置的长度 cout << "Length of line : " << line.getLength() <<endl; // 再次设置长度 line.setLength(6.0); cout << "Length of line : " << line.getLength() <<endl; return 0; } 当上面的代码被编译和执行时,它会产生下列结果:Object is being created, length = 10Length of line : 10Length of line : 6使用初始化列表来初始化字段使用初始化列表来初始化字段: Line::Line( double len): length(len) { cout << "Object is being created, length = " << len << endl; } 上面的语法等同于如下语法: Line::Line( double len) { length = len; cout << "Object is being created, length = " << len << endl; } 假设有一个类 C,具有多个字段 X、Y、Z 等需要进行初始化,同理地,您可以使用上面的语法,只需要在不同的字段使用逗号进行分隔,如下所示: C::C( double a, double b, double c): X(a), Y(b), Z(c) { .... } 类的析构函数类的析构函数是类的一种特殊的成员函数,它会在每次删除所创建的对象时执行。析构函数的名称与类的名称是完全相同的,只是在前面加了个波浪号(~)作为前缀,它不会返回任何值,也不能带有任何参数。析构函数有助于在跳出程序(比如关闭文件、释放内存等)前释放资源。下面的实例有助于更好地理解析构函数的概念:实例 #include <iostream> using namespace std; class Line { public: void setLength( double len ); double getLength( void ); Line(); // 这是构造函数声明 ~Line(); // 这是析构函数声明 private: double length; }; // 成员函数定义,包括构造函数 Line::Line(void) { cout << "Object is being created" << endl; } Line::~Line(void) { cout << "Object is being deleted" << endl; } void Line::setLength( double len ) { length = len; } double Line::getLength( void ) { return length; } // 程序的主函数 int main( ) { Line line; // 设置长度 line.setLength(6.0); cout << "Length of line : " << line.getLength() <<endl; return 0; } 当上面的代码被编译和执行时,它会产生下列结果:Object is being createdLength of line : 6Object is being deleted为什么C++的构造函数在class new 的就自动执行呢?在C++中,构造函数在对象创建时自动执行的设计是语言的核心特性,其背后蕴含着深刻的工程哲学和系统设计思想。以下是结构化解析:内存分配与构造分离new操作符实际执行两个独立操作:MyClass* obj = new MyClass(); // 等价于: void* mem = operator new(sizeof(MyClass)); // 1. 仅分配原始内存 MyClass* obj = new(mem) MyClass(); // 2. 在内存地址调用构造函数构造函数的本质编译器将构造函数视为类型初始化器:编译期在所有对象创建点自动插入构造函数调用构造函数签名经特殊处理(如添加隐式this指针参数)设计哲学解析一、对象生命周期完整性保障阶段 自动行为 意义创建期 构造自动执行 确保对象从诞生起就处于有效状态生存期 方法手动调用 赋予开发者控制权销毁期 析构自动执行 防止资源泄漏(RAII核心)二、类型系统安全的基石class Database { public: Database() { connect("default_server"); } // 强制初始化 }; // 若不自动构造: Database* db = (Database*)malloc(sizeof(Database)); db->query("SELECT..."); // 崩溃!未初始化的连接三、面向对象范式的实现基础继承链构造:自动按顺序调用基类构造函数class Base { Base() {/*基类初始化*/} }; class Derived : public Base { Derived() : Base() {/*编译器自动插入基类构造*/} };成员初始化:按声明顺序自动构造成员对象💡 关键优势分析防御性编程强化class File { HANDLE hFile; public: File(const char* name) : hFile(OpenFile(name)) { if(!hFile) throw "打开失败"; // 创建即验证 } }; // 使用时无法绕过验证 File log("data.bin"); // 要么有效对象,要么异常设计权衡与边界与C语言的本质区别🌟 总结:自动构造的核心价值安全屏障:消除未初始化对象风险范式实现:支撑RAII/异常安全等核心特性系统契约:对象诞生即满足类不变式(class invariant)工程效率:减少样板代码(对比C的手动初始化)类型完备:实现真正意义上的抽象数据类型(ADT)正如C++之父Bjarne Stroustrup所言:“构造函数不是可选的——它们定义了对象存在的意义”。这种设计强制保证了对象语义完整性,是C++类型安全的基石。怎么判断储C++的class 内部的function哪一个是构造函数,哪一个是析构函数在C++中,构造函数和析构函数有明确的语法特征和功能定位。以下是简明清晰的判断指南:🔍 构造函数识别特征命名规则函数名 必须与类名完全相同(大小写敏感)class MyClass { public: MyClass(); // ✅ 构造函数 };无返回类型不声明任何返回类型(连 void 都不需要)class Student { public: Student(string name); // ✅ 构造(无返回类型) void setGrade(); // ❌ 普通方法(有void) };可重载特性一个类可以有 多个构造函数(参数列表不同)class Point { public: Point(); // ✅ 默认构造 Point(int x, int y); // ✅ 带参构造 };析构函数识别特征命名规则函数名 必须是 ~类名(波浪号前缀)class Database { public: ~Database(); // ✅ 析构函数 };无参数无返回值严格无参数,且不声明返回类型class FileHandler { public: ~FileHandler(); // ✅ 正确形式 ~FileHandler(int); // ❌ 错误(不可带参数) };唯一性每个类 有且仅有一个 析构函数(不可重载)遇到类成员函数时问:是否与类名同名? → 构造函数候选是否带波浪号前缀? → 析构函数候选是否有返回类型? → 普通方法(非构造/析构)析构函数带参数? → 语法错误(必须无参)掌握这些规则后,您能瞬间识别任何C++类中的构造/析构函数。这种设计确保对象 诞生即初始化(构造),消亡即清理(析构),是C++资源管理的基石 💪。特殊场景辨析默认构造无参数的构造函数(编译器自动生成若未定义)class Widget { public: Widget(); // 显式默认构造 // 若未声明,编译器生成隐式默认构造虚析构函数(多态基类必备)class Shape { public: virtual ~Shape(); // ✅ 虚析构(允许派生类正确释放) };.
-
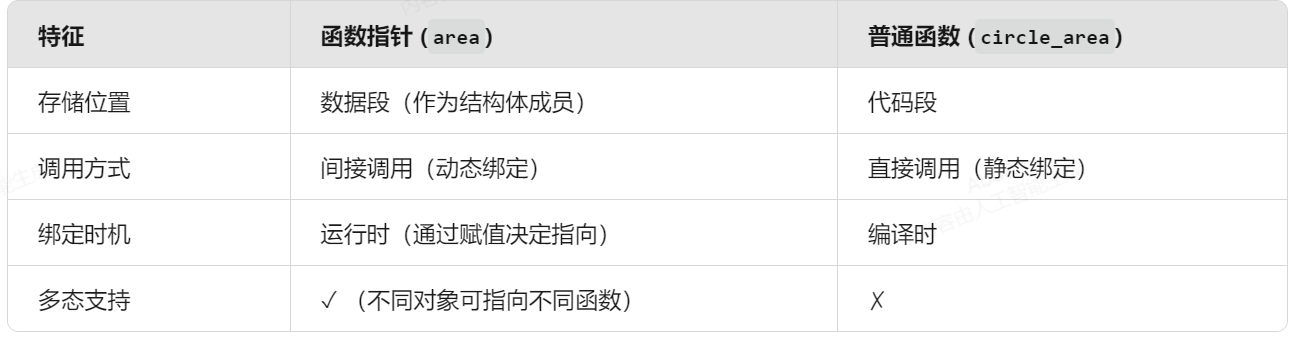
C语言实现面向对象三大特性 : 封装、继承、多态(2) http://bennyhe.cn/index.php/archives/1709/这个公众号写的例子解释得不清楚,让deepseek帮忙写了一个例子,加上解释。以下是一个使用C语言模拟面向对象编程的完整示例,通过结构体和函数指针实现封装、继承和多态三大特性:代码如下:#include <stdio.h> #include <stdlib.h> #include <math.h> // 基类:Shape(图形) typedef struct Shape { // 虚函数表 struct ShapeVTable* vtable; // 公共属性 float x; float y; } Shape; // 虚函数表定义 typedef struct ShapeVTable { // 多态方法 float (*area)(Shape* self); void (*move)(Shape* self, float dx, float dy); void (*draw)(Shape* self); } ShapeVTable; // 继承自Shape的子类:Circle(圆形) typedef struct Circle { Shape base; // 继承基类 float radius; // 特有属性 } Circle; // 继承自Shape的子类:Rectangle(矩形) typedef struct Rectangle { Shape base; // 继承基类 float width; float height; } Rectangle; // ======= Shape的方法实现 ======= float shape_area(Shape* self) { printf("调用基类area虚方法\n"); return 0.0f; } void shape_move(Shape* self, float dx, float dy) { self->x += dx; self->y += dy; printf("图形移动到(%.1f, %.1f)\n", self->x, self->y); } void shape_draw(Shape* self) { printf("在(%.1f, %.1f)绘制图形\n", self->x, self->y); } // 基类虚函数表实例 static ShapeVTable shape_vtable = { .area = shape_area, .move = shape_move, .draw = shape_draw }; // ======= Circle的方法实现 ======= float circle_area(Shape* self) { Circle* circle = (Circle*)self; return M_PI * circle->radius * circle->radius; } void circle_draw(Shape* self) { Circle* circle = (Circle*)self; printf("在(%.1f, %.1f)绘制圆形,半径: %.1f\n", circle->base.x, circle->base.y, circle->radius); } // Circle虚函数表(覆盖基类方法) static ShapeVTable circle_vtable = { .area = circle_area, .move = shape_move, // 复用基类方法 .draw = circle_draw }; // Circle构造函数 Circle* create_circle(float x, float y, float radius) { Circle* circle = malloc(sizeof(Circle)); circle->base.vtable = &circle_vtable; circle->base.x = x; circle->base.y = y; circle->radius = radius; return circle; } // ======= Rectangle的方法实现 ======= float rectangle_area(Shape* self) { Rectangle* rect = (Rectangle*)self; return rect->width * rect->height; } void rectangle_draw(Shape* self) { Rectangle* rect = (Rectangle*)self; printf("在(%.1f, %.1f)绘制矩形,尺寸: %.1fx%.1f\n", rect->base.x, rect->base.y, rect->width, rect->height); } // Rectangle虚函数表 static ShapeVTable rectangle_vtable = { .area = rectangle_area, .move = shape_move, .draw = rectangle_draw }; // Rectangle构造函数 Rectangle* create_rectangle(float x, float y, float width, float height) { Rectangle* rect = malloc(sizeof(Rectangle)); rect->base.vtable = &rectangle_vtable; rect->base.x = x; rect->base.y = y; rect->width = width; rect->height = height; return rect; } // ======= 多态演示函数 ======= void process_shape(Shape* shape) { printf("\n处理图形对象:\n"); shape->vtable->draw(shape); printf("面积: %.2f\n", shape->vtable->area(shape)); shape->vtable->move(shape, 2.0f, 3.0f); } // ======= 主函数 ======= int main() { // 创建派生类对象 Circle* circle = create_circle(1.0f, 1.0f, 5.0f); Rectangle* rect = create_rectangle(3.0f, 4.0f, 6.0f, 8.0f); // 演示多态 process_shape((Shape*)circle); process_shape((Shape*)rect); // 释放内存 free(circle); free(rect); return 0; }面向对象特性实现解析:1. 封装(Encapsulation)结构体封装:将数据和方法绑定在Shape结构体中私有性模拟:通过.c文件隔离实现细节(示例中为简化展示在单文件)构造函数:create_circle()和create_rectangle()实现对象初始化2. 继承(Inheritance)结构体嵌套:派生类包含基类结构体作为第一个成员typedef struct Circle { Shape base; // 继承基类成员 float radius; // 新增属性 } Circle;内存布局兼容:派生类指针可直接转为基类指针3. 多态(Polymorphism)虚函数表(VTable):通过ShapeVTable实现动态绑定typedef struct ShapeVTable { float (*area)(Shape* self); void (*move)(Shape* self, float dx, float dy); } ShapeVTable;方法覆盖:派生类重写虚表函数指针static ShapeVTable circle_vtable = { .area = circle_area, // 覆盖基类方法 .move = shape_move // 复用基类方法 };4. 多态调用// 统一接口处理不同派生类 void process_shape(Shape* shape) { shape->vtable->draw(shape); // 动态绑定到具体实现 shape->vtable->move(shape, 2, 3); }执行结果示例:处理图形对象:在(1.0, 1.0)绘制圆形,半径: 5.0面积: 78.54 图形移动到(3.0, 4.0)处理图形对象:在(3.0, 4.0)绘制矩形,尺寸: 6.0x8.0面积: 48.00 图形移动到(5.0, 7.0)️扩展实现技巧:内存管理:可添加destroy()虚函数实现对象析构类型安全:增加type_id字段实现运行时类型检查接口抽象:定义纯虚函数表作为接口规范多重继承:通过多个基类结构体嵌套实现(需谨慎处理内存布局)动态创建:使用注册表和字符串ID创建对象💡 实际应用场景:Linux内核(task_struct)、GTK+ GUI库(GObject)、CPython解释器(PyObject)均使用类似技术实现面向对象编程此方案展示了C语言实现OOP的核心模式,虽然需要手动管理虚表和内存,但提供了接近原生OOP语言的功能和性能。问题1:针对上面例子,typedef struct ShapeVTable { float (*area)(Shape* self); void (*move)(Shape* self, float dx, float dy); } ShapeVTable;中area 是指什么?是一个function 还是struct?在C语言面向对象编程示例中,typedef struct ShapeVTable 定义中的 area 是一个函数指针,而非普通函数或结构体。以下是详细解析:typedef struct ShapeVTable { float (*area)(Shape* self); // ← 核心声明 void (*move)(Shape* self, float dx, float dy); } ShapeVTable;特性 说明类型 函数指针 (Function Pointer)作用 指向计算图形面积的具体实现函数内存表示 存储函数入口地址的指针(通常4/8字节)调用方式 通过指针间接调用:shape->vtable->area(shape)多态关键 不同子类(Circle/Rectangle)可指向不同的实现函数float:函数返回值类型(area):声明名为 area 的指针( 表示指针)(Shape* self):函数参数列表(接收Shape指针)关键价值:实现多态// 统一接口处理不同图形 void print_area(Shape* shape) { // 动态调用具体实现 float a = shape->vtable->area(shape); printf("面积: %.2f\n", a); }圆形对象:实际调用 circle_area()矩形对象:实际调用 rectangle_area()新增图形:只需实现新的area函数并更新虚表问题2:上面例子中// Circle虚函数表(覆盖基类方法) static ShapeVTable circle_vtable = { .area = circle_area, .move = shape_move, // 复用基类方法 .draw = circle_draw }中 虚函数表就是C语言的列表吗? .area 表示什么意思?本质:虚函数表是包含函数指针成员的静态结构体实例,通过为不同子类创建不同的静态实例实现多态。🔑 .area 成员详解.area 的双重身份作为结构体成员在ShapeVTable定义中声明为成员变量:typedef struct ShapeVTable { float (*area)(Shape* self); // 成员声明 } ShapeVTable;作为函数指针容器初始化时赋予具体函数地址.area = circle_area // 函数指针赋值️ 运行时工作原理多态调用流程sequenceDiagram participant Main as main() participant Shape as Shape指针 participant VTable as circle_vtable participant Function as circle_area() Main ->> Shape: (Shape*)circle Shape ->> VTable: 访问vtable VTable ->> Function: 调用.area成员指向的函数 Function -->> Shape: 计算圆形面积 Function -->> Main: 返回结果 键技术点静态初始化static关键字确保虚函数表:在编译期分配内存在程序启动时初始化生命周期贯穿整个程序点运算符(.)作用在初始化中使用.area是C99的指定初始化器(Designated Initializer):函数指针转换编译器自动处理函数类型转换:// circle_area实际类型:float (*)(Circle*) // 虚表要求类型:float (*)(Shape*) .area = (float(*)(Shape*))circle_area // 编译器隐式转换 核心价值体现// 统一接口 float calculate_area(Shape* shape) { return shape->vtable->area(shape); // 多态魔法发生处 }圆形对象:调用circle_area()radius² × π矩形对象:调用rectangle_area()width × height新增图形:只需实现新函数并更新虚表⚠️ 重要注意事项:函数签名必须严格匹配(返回类型+参数类型)派生类函数需通过强制转换访问子类特有成员问题3:上面例子中main 函数里面的process_shape((Shape*)circle);process_shape((Shape)rect); 中 process_shape((Shape)circle); 就是shape->vtable->draw(shape); 这里draw 就是static ShapeVTable circle_vtable 中绑定的circle_draw 这个方法吗? process_shape((Shape*)rect); 做shape->vtable->draw(shape); 这里draw 就是static ShapeVTable rectangle_vtable 中绑定的rectangle_draw 这个方法吗? 是怎么做到在rectangle_vtable 和 circle_vtable 自动匹配的?是的,您完全理解正确!下面我用清晰的逻辑解析这个多态调用的精妙机制:对于圆形对象:✅ process_shape((Shape*)circle) 中的 draw 调用✅ 确实绑定到 circle_vtable 的 circle_draw🔄 调用链:shape->vtable->draw → circle_vtable.draw → circle_draw对于矩形对象:✅ process_shape((Shape*)rect) 中的 draw 调用✅ 确实绑定到 rectangle_vtable 的 rectangle_draw🔄 调用链:shape->vtable->draw → rectangle_vtable.draw → rectangle_draw自动匹配的实现原理一、对象创建时的类型烙印// 创建圆形对象时 Circle* create_circle(...) { Circle* circle = malloc(sizeof(Circle)); circle->base.vtable = &circle_vtable; // 关键烙印! }circle->base.vtable 被永久赋值为 &circle_vtable 的地址即使转为基类指针 (Shape*)circle,内存中的 vtable 指针保持不变调用时的动态解析当执行 shape->vtable->draw(shape):访问 vtable 指针// 从对象内存中读取vtable地址 ShapeVTable* vtable_ptr = shape->vtable; 对 circle:获得 circle_vtable 地址对 rect:获得 rectangle_vtable 地址定位函数指针// 从vtable结构体获取draw成员 void (*draw_func)(Shape*) = vtable_ptr->draw;编译器自动计算成员偏移量(固定偏移)间接函数调用draw_func(shape); // 执行指针指向的函数 CPU直接跳转到函数入口地址circle_vtable.draw → circle_drawrectangle_vtable.draw → rectangle_draw⚙️ 关键技术保障内存布局一致性对象类型 内存偏移0位置 意义Circle Shape base C标准保证基类位于起始地址Rectangle Shape base 使得 (Circle)→(Shape) 转换安全静态绑定机制cpp复制// 编译时即确定的绑定关系(非运行时查找)static ShapeVTable circle_vtable = { .draw = circle_draw // 编译期硬编码绑定 };函数指针本质typedef void (*DrawFunc)(Shape*); // 统一函数签名 // 等价于: draw_func(shape); // 汇编实现: mov rax, [shape] ; 取vtable地址 mov rbx, [rax+8] ; 取draw指针(假设偏移8字节) call rbx ; 间接调用💡 多态效果图解mermaidsequenceDiagramparticipant Caller as process_shape() participant Object as Shape对象 participant VTable as 虚函数表 participant Impl as 具体实现 Caller ->> Object: shape->vtable->draw() Object ->> VTable: 查询我的vtable alt 圆形对象 VTable ->> Impl: 调用circle_draw() else 矩形对象 VTable ->> Impl: 调用rectangle_draw() end Impl -->> Caller: 执行结果 关键结论:自动匹配的核心在于每个对象创建时,其内部 vtable 指针已被永久绑定到专属虚函数表。类型转换只改变指针解释方式,不改变对象内存本质。当通过基类指针调用虚函数时,实际通过原始 vtable 指针找到最终实现。这种设计完美模拟了C++的虚函数机制,Linux内核(如file_operations)、Windows驱动模型(WDF_OBJECT_ATTRIBUTES)等核心系统均采用此方案实现多态。